Sunday, November 27, 2016

Cold Weather Food - Stew, Meatloaf, Crockpot Chicken!

So, these have been in the works for about 2 months.  Yes.  I have been trying to post for two.months.  Work, toddlerhood, family, and friends have taken the front seat, which the way it should be... but now, I give you three delicious, and fairly easy, meals.  They are each from a different friend (thanks mom friends!), and therefore are minimally modified.

Easy Meatloaf (not dry!)

  • 2 lbs ground beef or turkey
  • 1 cup chopped onions
  • 2 garlic cloves, minced
  • 1/4 cup ketchup (plus optional 1/4 cup for topping)
  • 1/4 cup chopped parsley (4 tbsp if dry)
  • 1 tbsp coconut flour
  • 1/4 cup almond meal or 1/4 cup gluten free breadcrumbs
  • 2 tbsp grated Parmesan cheese
  • 3/4 cup shredded cheddar cheese
  • 2 tbsp dijon mustard
  • 1 large egg, beaten
  • 3/4 tsp dried oregano
  • salt and pepper to taste

Heat a skillet over medium heat and saute the onions and garlic until lightly browned.  Let cool, then combine with remaining ingredients.  Shape into 6 equal sized loaves and place in a cooking pan.  If desired, spread some ketchup over the top of each (about 2 tbsp a loaf). Bake at 425 degrees for about 25 minutes.  Center should be moist but not pink.

We like to serve with broccoli or sauteed greens, and top with sriracha mayonnaise...


The Best Beef Stew - crock pot or stove

  • 3 lbs boneless beef stew meat, cut into chunks
  • 3 tbsp flour, or arrowroot powder
  • 1 tsp salt, plus more, to taste
  • 1 tsp freshly ground pepper, plus more, to taste
  • 1 package of sliced mushrooms (optional)
  • 2 medium carrots, chopped
  • 1 sweet potato, peeled and cubed
  • 1 potato, peeled and cubed (or 5 small red potatoes)
  • 1 onion, diced
  • 2 tbsp tomato paste
  • 2 tbsp dijon
  • 1 tbsp crushed rosemary
  • 1 bay leaf
  • 3 garlic cloves, minced
  • 1 cup dry red wine
  • 2 cups beef broth
  • 4 oz. thick-cut bacon, chopped (optional)

If adding bacon... In a large fry pan over medium heat, cook the bacon, stirring occasionally, until crisp, 5 to 7 minutes. Transfer the bacon to paper towels to drain. Pour off the drippings into a small heatproof bowl, leaving about 1 Tbs. drippings in the pan. Set the pan, reserved drippings and bacon aside.

In a plastic bag, combine the flour, the 1 tsp. salt and the 1/2 tsp. pepper. Add the beef chunks and shake to coat evenly with the flour mixture. Heat pan on medium, and add the bacon drippings or olive oil. Add half of the beef chunks and cook, turning once, until well browned. Transfer the beef to the slow cooker, or if doing all on stove top, set aside.

Add the veggies to the pan, with more oil, and let them brown for a few minutes, then also remove from pan and set aside. If in crock pot, now scatter the veggies on top of the meat.

Now, combine the broth, mustard, and tomato paste in the same pan. Mix well, bring to a boil and deglaze the pan, stirring to scrape up the browned bits on the pan bottom. If doing all on stove top, add the wine and all other components back in, as well as rosemary and bay leaf, and cook on a low, simmering heat for 1-4 hours.

If in crock pot, pour the wine and contents of the pan over the vegetables and beef. Cover and cook on the high-heat setting for 4 to 5 hours or the low-heat setting for 8 to 9 hours. The beef should be very tender. Stir in the bacon and the rosemary. Cook, uncovered, on the high-heat setting for 10 minutes more to thicken the sauce slightly. Season with salt and pepper and serve.

Either way, it's delicious with some crusty, well buttered bread, or the primal friendly 90 second bread!

**minimally modified from http://www.williams-sonoma.com/recipe/beef-stew-with-bacon.html 


Super Easy Chicken Maribella

  • 2 lbs chicken breast or thighs
  • 5 small red potatoes, cubed with skin on
  • 1 cup red wine vinegar
  • 1 cup manzanilla green olives, with juice
  • 1 1/2 cups prunes
  • 1/2 cup olive oil
  • 1 tbsp Italian seasoning 
  • 1 bay leaf
  • salt and pepper to taste
Place potatoes in the bottom of the crockpot, then add the chicken on top.  Next, pour all remaining ingredients over it all.  Place on low for 8 hours and enjoy!


Monday, June 20, 2016

Iron Rich Baby Pancakes

Well, we're back on the iron train here.  I honestly have no idea how he could have scored in the low range for iron since we basically eat everything that's high in iron, but he did.  Anyways, since I need some easier batch meals for when I head back to work in the fall, I am adding these to my repertoire now.  I probably wouldn't eat them myself since they have wheat in them, but they are tasty!

This makes A LOT.  About 15 pancakes the size of my hand, which means if you opt to make them smaller, since your child does not eat like a truck driver you will get a sizable quantity.  Bug ate 6 in one sitting though so all my prep made roughly 3 meals... what can I say?  He likes his food!  I plan to use these 2-3 times a week to help boost the iron he's already getting from the other meals he eats.

Please note: these recipes are supplemental, since he also gets what we make for ourselves every day.  I am not in my kitchen all day making him gourmet baby only meals :)

Anyways, here they are...

Iron Baby Pancakes
  • 1/2 cup whole wheat flour (I used Bob's Red Mill organic whole wheat)
  • 1/2 cup baby barley (or rice) cereal, uncooked (I used nurtureme cereal)
  • 1/2 cup baby oatmeal cereal, uncooked (I used Earth's Best)
  • 1/2 cup mashed banana
  • 1/2 cup pumpkin puree (optional, makes cakes very moist)
  • 2 tbsp grapeseed oil
  • 3 eggs
  • 1/2 tsp baking soda
  • 1/2 tsp ginger
  • 1 tsp cinnamon
  • dash of chinese 5 spice powder (optional)
  • 1 cup water or apple juice (or milk, but minimizes iron absorption)

Combine all ingredients, making sure there are now lumps.  Cook using butter or nonstick spray, using the flip-squish technique (flip once ready, squish it down).  I use 1/4 cup to make larger cakes.  If you want small ones, just use a tablespoon or only fill the 1/4 scoop halfway.  Also, if you added the pumpkin, you have to cook these pretty well done, like in my picture, since they will be very moist.  Didn't slow the eater down though.  Toppings are also an option, but none were needed in our house.

Enjoy!


**modified from wholesomebabyfood.momtastic.com

Sunday, May 22, 2016

Get Your Fish! Tuna Melt Patties

It's been a productive month!  Whenever spring finally hits I get a wonderful burst of energy that translates to reorganizing the entire house (sorry Eric), and cooking new meals.  Here's the latest.

In an effort to get some fish protein into the ever growing (and all consuming) little bug, I modified this recipe.  I'll be honest, I had very low expectations for the recipe, but it far surpassed them.  It's primal, and delicious!  Very much like a tuna melt, minus the bread.  And leftovers are delicious too.


Tuna Melt Patties
  • 2 tbsp coconut flour
  • 1 piece toasted and crumbled bread (optional)
  • 1/2 cup shredded cheddar cheese
  • 2 cans tuna (5 oz each), drained
  • 2 eggs, beaten
  • 2 tsp dijon mustard
  • 1 tsp garlic powder
  • 1 tsp onion powder
  • 1/2 tsp paprika
  • 1/2 tsp chili powder
  • 2 teaspoon fresh lemon juice
  • salt and pepper to taste

In a bowl, add both cans of tuna and use a fork to break it up.  Add remaining ingredients mix well.  Heat pan with olive oil in it.  The more oil the more "fried" they will be.  I just use a drizzle.  While pan is heating, make patties from the tuna mixture to the size of your liking.  Fry in pan carefully (hot oil is hot and hurts)  until golden brown, then flip, flatten, and let cook on other side.

Serve with a side of avocado, a salad, or just eat on the go.

Enjoy!


Friday, May 13, 2016

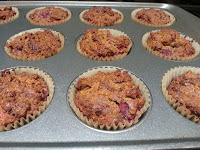
Breakfast On The Go: Raspberry Chocolate Chip Protein Muffins

It's finally spring, which means I spend my days outside.  This also means half the time I forget to eat and then find myself out with no food and it's the perfect excuse to eat ice cream instead.  Enter these delicious muffins.  The addition of protein powder makes them surprisingly filling, and they travel well!

Raspberry Chocolate Chip Protein Muffins (makes 6 muffins)
  • 1 cup almond flour
  • 1/4 cup unflavored protein powder
  • 2 eggs
  • 1/4 cup coconut oil, melted (or butter)
  • 1 tbsp honey
  • 1 tsp vanilla extract
  • 1 teaspoon apple cider vinegar
  • 1/2 teaspoon baking soda
  • 1/4 teaspoon sea salt
  • 1/2 tsp cinnamon
  • splash of lemon juice
  • 1/2 cup fresh raspberries (or frozen)
  • 1/4 cup mini chocolate chips
  • 6 muffin liners
Combine all the ingredients, except for the raspberries and chocolate chips. When well mixed, fold in the raspberries and chocolate chips.


Place liners in the muffin tin, then scoop batter in.  The batter will be sticky, not runny.  Tins should be at least 3/4 filled, the more the better because they don't rise much.  Bake for 25-30 minutes at 350 degrees until they don't make a "squishy" sound when you press on the top of one.

Slather with butter, or take some on the road... you won't be disappointed!


**Modified from detoxinista.com

Friday, May 6, 2016

It's a Hit! Quick Banana Pancakes

Not much to say today, it's been a long rainy week and honestly I'm just glad we made it to Friday.  To lift everyone's spirits this morning I decided to make some pancakes.  Healthy pancakes.  In ten minutes.  For all three of us.

Enter this recipe, full of fruit, good fats, and protein.  They were definitely well liked by all members of the household.  Let's just say that someone devoured 4 whole pancakes while his parents got the leftovers (3 each).  How's that for love?!

Without further ado...

Quick (and healthy) Banana Pancakes

  • 2 ripe bananas, mashed
  • 4 eggs
  • 2 tbsp coconut flour
  • 2 tbsp flax meal
  • 1/4 tsp baking powder
  • 1/2 tsp cinnamon

Mix all ingredients together.  Portion into greased skillet (I used a 1/4 cup scoop).  Cook until dark brown, then flip, squish down, and wait until browned on that side as well.

Repeat.  Serve naked (not you, the pancakes), or my favorite is with almond butter and some honey or maple syrup on top.


Oh, and enjoy (if there's any left for you)!


Tuesday, April 12, 2016

April's Crazy. Here's An Easy Meal: Chicken or Beef Enchiladas

It's April and things are crazy over here.  From 70 degrees and lounging in the park to below freezing and fighting off snow, this month sure is off to a great start.  Enter my latest obsession on the mexican dish front... enchiladas!  It's definitely a comfort food and has a lot of dairy in it, but I think it's perfect for this up and down weather.

In my opinion this is a quick and easy meal... but some might argue that since it requires stove top cooking it's not necessarily "quick".  Regardless, it takes less than 30 minutes to put this together and it is DELICIOUS.  I suggest you use rotisserie chicken since it will retain moisture better OR cook your ground beef in the crock pot.  But you are your own person... do what you will :)

Chicken or Beef Enchiladas

  • 2 lbs cooked chicken (from rotisserie) or pre-cooked ground beef
  • 1 tbsp. olive oil
  • 1 onion
  • 1 red pepper
  • 1 cup sour cream
  • 1 cup shredded cheddar cheese
  • 2 cups salsa of your choice
  • 2 cloves minced garlic
  • 1 tsp cumin
  • 1 tsp lime juice
  • 1/4 cup broth or water
  • corn tortillas (or flour)
  • salt and pepper to taste


Heat olive oil in a large skillet over medium heat. Add the cumin, garlic, onion, pepper, and season with salt and pepper.  Cook until tender, 5 to 6 minutes, then stir in 1/4 cup water (or broth) and sour cream. Remove from heat and fold in the meat, lime juice, 1/2 cup salsa, and 1/2 cup of the cheese.


Spread 1/2 cup of the salsa in a baking dish. Place cooked beef or chicken mixture in the tortillas (fill to your desired fullness), roll, and place "seam down" in the dish. Top with the remaining salsa and cheese. Bake until beginning to brown, about 15 minutes at 350°F.

Let cool a few minutes, then dig in.  We like ours with sour cream and guacamole.  And as always, enjoy!

(sorry, we ate it too fast for a final picture)


Friday, February 19, 2016

Iron Rich Finger Foods: Baby Cakes

A baby post was bound to happen eventually, right?  Sorry, it comes with the territory these days, but I'll try to make it quick.  It's been a long (yet incredibly quick) journey from the screaming little nugget we brought home to this crazy, independent, opinionated, thoughtful, and cuddly little boy we see emerging.  While it seemed as if it would never happen, he finally is really into the solids, which is fun but also disgustingly messy.

Since he loves to eat now, I have started to try to increase his iron levels.  Why, you ask?  Well, at the risk of boring any non-parent, and because I am pressed for time, the short version is this: babies are born with enough iron stores to support their growth until 6 months.  After that they need supplementation to get the amount they need.  This can be through a vitamin, or through solids.  See?  That wasn't too painful was it?

Anyways.  He's still not really into meat yet, and since we are doing finger foods and not purees it means I have to get a bit more creative with his iron sources.  There's only so much peanut butter one kid can eat... or is there.  So, after much messing around, and lots of goopy, messy mealtimes, I finally came up with recipes that  fulfilled my desired criteria.  1) give a substantial amount of iron, 2) have a variety of food sources and vitamins, and 3) (hopefully) won't make him constipated.  My life is pretty awesome right now, can you tell?

The final goal was that these finger foods taste good, because let's be honest, if I am cooking I better be able to reap the rewards too.  The result?  The two recipes below.  Remember, you can eat these too.  I am more partial to the egg muffins but I imagine the bean cakes would taste delicious with eggs over them.  Of course, another baby friendly finger food is the muffin recipe from my previous post.  Bug really devours those.

Well, that's it for the baby talk today... here they are, enjoy!

Sweet Bean Cakes
  • 15 oz can of black beans (no salt added)
  • 1 cup shredded sweet potato raw
  • 1/2 cup mashed banana
  • 3 oz prune puree
  • 1 tsp cinnamon

Drain and rinse the beans. In a bowl, mash the banana and beans and add the rest of the ingredients.  Mix until combined but leave some texture.  Form the mixture into little cakes and place on greased baking sheet.  If the mixture seems too soft add a little flour or almond meal.  Cook for 15 minutes at 350, flatten with a spatula, and cook for another 10, until only slightly squishy.  Remove and let cool.


No, they are not attractive, but they taste delicious!  This also makes a ton so you can freeze excess cakes for future use.


Egg and Spinach Muffins
  • 6 large eggs
  • 1 cup steamed and diced spinach (I buy frozen then thaw and drain the liquid)
  • 1/3 cup shredded sweet potato (raw)
  • garlic powder, onion powder, pepper to taste

Combine all ingredients.  Pour into greased muffin tins filling 2/3 full, since they rise. If desired, sprinkle some cheese on top.  Bake at 375 for about 20 minutes until muffins have risen and are slightly brown and set.  Makes 6-8 cakes.


Thursday, January 21, 2016

Minimally Modified: Quick and Easy Apple Cinnamon Muffins

So, it's officially winter, which means cold.  It also means cozy days with tea, coffee, and preferrably muffins.  Here's a super easy recipe that takes almost no time and really delivers on deliciousness.  In fact, I am eating one now!


Apple Cinnamon Muffins 
(makes 6-8)
  • 4 eggs
  • 1 cup applesauce (I recommend homemade)
  • ½ cup coconut flour
  • 1 tbsp cinnamon
  • 1 tsp baking soda
  • 1 tsp ground ginger 
  • 1/2 cup chopped walnuts
Put all ingredients except nuts into a medium sized bowl and mix until no lumps.  Fold in walnuts.  Fill muffin tins at least 3/4 full.  Bake 15-20 minutes on 400 until starting to brown and not squishy when lightly touched on the top.  Let cool 2 minutes, drizzle with honey or butter or deliciousness of your choice and enjoy!

**minimally modified from http://wellnessmama.com